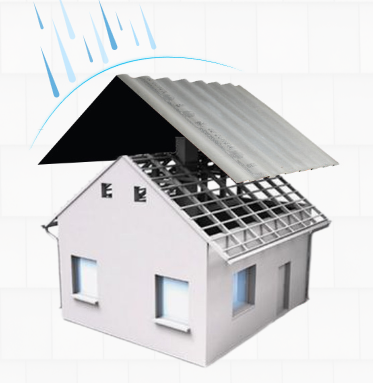
How to fix Fibre Cement Corrugated Sheet on Sloping Roof
Sloping roofs paired with fibre cement sheets offer exceptional strength, durability, and water repellency. These roofing systems protect against harsh weather, ensuring a leak-free environment.
Installation is Key: Proper installation is essential to secure sheets, ensure correct overlap, and withstand wind and rain. Follow best practices to maximize the benefits of this durable roofing solution.
Materials & Tools Needed:
- Corrugated Fibre Cement Roofing Sheets
- Roofing nails/screws with rubber washers
- Drill, measuring tape, ladder- Cat ladder or Safety ladder
- Safety gears
- Ridge caps, flashing, sealant
- Safety nett
Laying
- Preparation:
- Inspect Roof Structure: Inspect Roof Structure: Check purlin spacing, sheet length, and ensure proper alignment with a minimum 150 mm end lap, 40 mm side lap and appropriate overhang.
- Sheet Arrangement:
- Starting Point: Begin at the bottom left corner, aligning the first sheet with the purlin, smooth side out.
- End & Side Laps: Maintain a 150 mm end lap and at least 1/2 corrugation side lap for effective drainage.
- Laying and Fixing Sheets:
- First Sheet: Place with downward corrugation on the left, upward on the right.
- Next Sheets: Overlap properly, ensuring mitred corners fit securely.
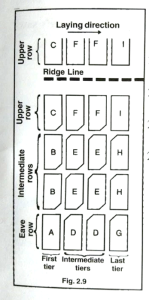
4. Ridge and Eaves:
- Ridge Sheets: Fit correctly to prevent leaks.
- Eaves Overhang: Keep overhang within 300 mm to avoid stress.
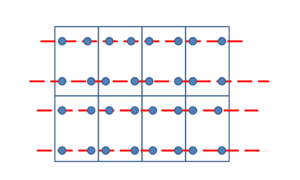
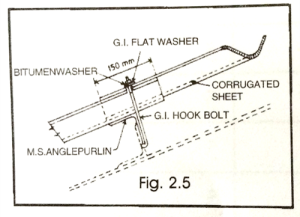
- Fixing Sheets and Bolting
- Drilling Holes: Drill 10 mm holes on corrugation crowns, using 8 mm hook bolts.
- Bolt Placement: Bolt Should be placed adjacent to side laps on every purlin. Overtightening of bolts should be avoided which leads to crack development in the summer season
- Mitring and Cutting:
- Cutting Sheets: Use a carpenter’s saw, ensuring clean cuts. Dimension of mitring- 150 mmx 40 mm.
- Mitring Corners: Mitre intermediate sheets at lap joints for a snug fit.

- Final Checks and Adjustments:
- Check Alignment: Regularly check the alignment of sheets to ensure they remain straight.
- Points to remember while fixing of sheets
- Smooth surface of the sheet should be upwards.
- Never punch holes – drill them.
- Drill holes in sheets – at least 2 mm larger than fixing bolts.
- Be sure sheets are mitred by cutting with a saw.
- Nuts should be screwed lightly first and tightened only after 13 or 14 sheets are laid.
- Tighten the nuts evenly allowing the bitumen washer to merely seal the space between the holes and bolts.
- overtighten the nuts. Allow for the movement of structure.
- Don’t exceed purlin spacing of 1.4 metres for roofing and 1.7 metres for side claddings.
- Provide a purlin at every end.
- Don’t exceed free overhang of 300 mm at eaves.
- Slope of the roof not less than 18 degrees.
- Proper cross ventilation to be maintain in the room to minimise condensation effect in the rainy season.
- Wherever four corners of sheets overlap, the intermediate two Sheets must be mitred in order to secure a perfect fit. The length and breadth of mitre should be equal to the length of the end lap and the breadth of the side lap of the roofing sheets.
- If mitring is not done, staggered fixing method to be adopted.
By following these steps and incorporating best practices, you can ensure a secure and durable installation of fibre cement corrugated roofing sheets.